自宅サーバ構築MY HOME SERVER
|

- メールサーバ(Postfix / Dovecot) -
メール送受信をするSmtpサーバにはPostfixを使います。受信したメールをユーザのメールボックス
に運ぶPop/ImapサーバはDovecotを使用します。外部ドメインからもメールクライアントで自宅サーバ
にアクセスできるように設定します。メールアカウントの追加もします。メールサーバ使用に当たって
iptables及びルータのポート(25,110,143,587,993,995)を開放する必要があります。SSL証明書
も事前に作成していることが、前提条件です。
- 注意点 -
設定に入る前に、現在使用しているISP(インターネットサービスプロバイダ)のSmtpサーバ
のアドレスを調べてください。そのアドレスを設定内容のrelayhost = [ISP名]に記入する必要があります。
Google等で、自宅サーバ relayhost ISP名 等で検索すると情報が出てくると思います。サンプル記述例
は下記のとおりです。この設定をしない場合、外部ドメインにメール送信ができません。
例1 朝日ネット relayhost = [op25b.asahi-net.or.jp]
例2 YahoBB relayhost = [ybbsmtp.mail. yahoo.co.jp]:587
例3 so-net relayhost = [mail.xa2.so-net.ne.jp]
- Postfixの設定 -
Posftixのインストール、設定をします。
root@hoge123:~# aptitude -y install postfix postfix-tls sasl2-bin Tabキーを押して「OK」を選択、Enterキーを押します。 smtpd_client_restrictions = permit_mynetworks,reject_unknown_client,permitsmtpd_recipient_restrictions = permit_mynetworks,permit_auth_destination,permit_sasl_authenticated,reject |
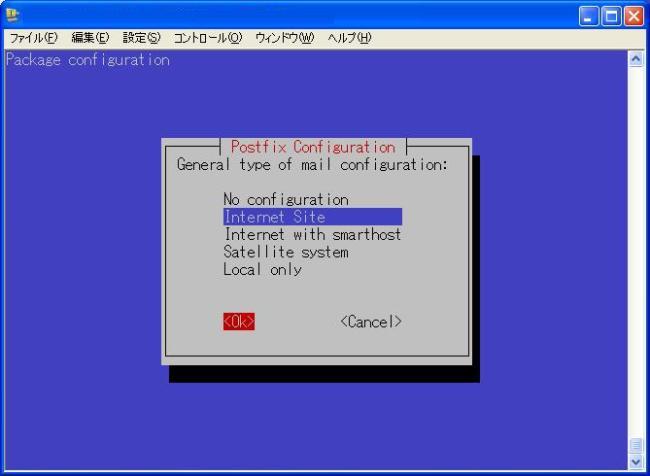
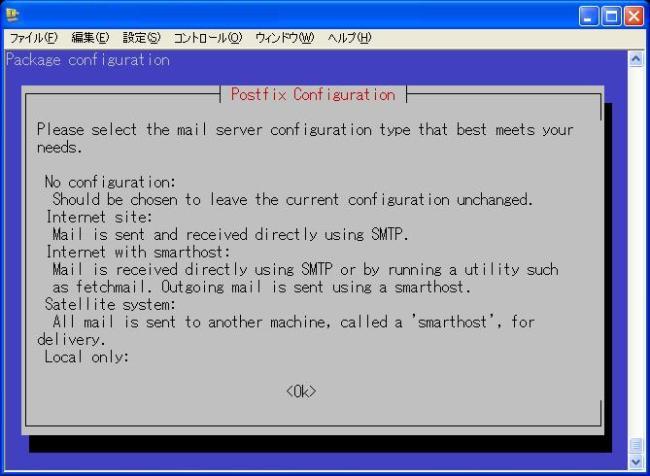 矢印キーを押して「Internet Site」を選択、Tabキーで「OK」を選択後、Enterを押します。
 root@hoge123:~# vi /etc/postfix/main.cf
- 設定前 -
# See /usr/share/postfix/main.cf.dist for a commented, more complete version
# Debian specific: Specifying a file name will cause the first
# line of that file to be used as the name. The Debian default
# is /etc/mailname.
#myorigin = /etc/mailname
smtpd_banner = $myhostname ESMTP $mail_name (Debian/GNU)
biff = no
# appending .domain is the MUA's job.
append_dot_mydomain = no
# Uncomment the next line to generate "delayed mail" warnings
#delay_warning_time = 4h
readme_directory = no
# TLS parameters
smtpd_tls_cert_file=/etc/ssl/certs/ssl-cert-snakeoil.pem
smtpd_tls_key_file=/etc/ssl/private/ssl-cert-snakeoil.key
smtpd_use_tls=yes
smtpd_tls_session_cache_database = btree:${data_directory}/smtpd_scache
smtp_tls_session_cache_database = btree:${data_directory}/smtp_scache
# See /usr/share/doc/postfix/TLS_README.gz in the postfix-doc package for
# information on enabling SSL in the smtp client.
myhostname = hoge123.hoge123.dip.jp
alias_maps = hash:/etc/aliases
alias_database = hash:/etc/aliases
myorigin = /etc/mailname
mydestination = hoge123.dip.jp, hoge123.hoge123.dip.jp, localhost.hoge123.dip.jp, localhost
relayhost =
mynetworks = 127.0.0.0/8 [::ffff:127.0.0.0]/104 [::1]/128
mailbox_size_limit = 0
recipient_delimiter = +
inet_interfaces = all
- 設定後 -
# See /usr/share/postfix/main.cf.dist for a commented, more complete version
# Debian specific: Specifying a file name will cause the first
# line of that file to be used as the name. The Debian default
# is /etc/mailname.
#myorigin = /etc/mailname
smtpd_banner = $myhostname ESMTP $mail_name (Debian/GNU)
biff = no
# appending .domain is the MUA's job.
append_dot_mydomain = no
# Uncomment the next line to generate "delayed mail" warnings
#delay_warning_time = 4h
readme_directory = no
# TLS parameters
smtpd_tls_cert_file=/etc/ssl/server.crt
smtpd_tls_key_file=/etc/ssl/server.key
smtpd_use_tls=yes
smtpd_tls_session_cache_database = btree:${data_directory}/smtpd_scache
smtp_tls_session_cache_database = btree:${data_directory}/smtp_scache
# See /usr/share/doc/postfix/TLS_README.gz in the postfix-doc package for
# information on enabling SSL in the smtp client.
myhostname = hoge123.hoge123.dip.jp
alias_maps = hash:/etc/aliases
alias_database = hash:/etc/aliases
myorigin = /etc/mailname
mydestination = hoge123.dip.jp, hoge123.hoge123.dip.jp, localhost.hoge123.dip.jp, localhost
relayhost = [XXX.XXX.XXXX.XX.XX]
mynetworks = 127.0.0.0/8, 192.168.0.0/24
mailbox_size_limit = 0
recipient_delimiter = +
inet_interfaces = all
home_mailbox = Maildir/
smtpd_sasl_type = dovecot
smtpd_sasl_path = private/auth-client
smtpd_sasl_auth_enable = yes
smtpd_sasl_security_options = noanonymous
smtpd_sasl_local_domain = $myhostname
root@hoge123:~# vi /etc/postfix/main.cf
- 設定前 -
# See /usr/share/postfix/main.cf.dist for a commented, more complete version
# Debian specific: Specifying a file name will cause the first
# line of that file to be used as the name. The Debian default
# is /etc/mailname.
#myorigin = /etc/mailname
smtpd_banner = $myhostname ESMTP $mail_name (Debian/GNU)
biff = no
# appending .domain is the MUA's job.
append_dot_mydomain = no
# Uncomment the next line to generate "delayed mail" warnings
#delay_warning_time = 4h
readme_directory = no
# TLS parameters
smtpd_tls_cert_file=/etc/ssl/certs/ssl-cert-snakeoil.pem
smtpd_tls_key_file=/etc/ssl/private/ssl-cert-snakeoil.key
smtpd_use_tls=yes
smtpd_tls_session_cache_database = btree:${data_directory}/smtpd_scache
smtp_tls_session_cache_database = btree:${data_directory}/smtp_scache
# See /usr/share/doc/postfix/TLS_README.gz in the postfix-doc package for
# information on enabling SSL in the smtp client.
myhostname = hoge123.hoge123.dip.jp
alias_maps = hash:/etc/aliases
alias_database = hash:/etc/aliases
myorigin = /etc/mailname
mydestination = hoge123.dip.jp, hoge123.hoge123.dip.jp, localhost.hoge123.dip.jp, localhost
relayhost =
mynetworks = 127.0.0.0/8 [::ffff:127.0.0.0]/104 [::1]/128
mailbox_size_limit = 0
recipient_delimiter = +
inet_interfaces = all
- 設定後 -
# See /usr/share/postfix/main.cf.dist for a commented, more complete version
# Debian specific: Specifying a file name will cause the first
# line of that file to be used as the name. The Debian default
# is /etc/mailname.
#myorigin = /etc/mailname
smtpd_banner = $myhostname ESMTP $mail_name (Debian/GNU)
biff = no
# appending .domain is the MUA's job.
append_dot_mydomain = no
# Uncomment the next line to generate "delayed mail" warnings
#delay_warning_time = 4h
readme_directory = no
# TLS parameters
smtpd_tls_cert_file=/etc/ssl/server.crt
smtpd_tls_key_file=/etc/ssl/server.key
smtpd_use_tls=yes
smtpd_tls_session_cache_database = btree:${data_directory}/smtpd_scache
smtp_tls_session_cache_database = btree:${data_directory}/smtp_scache
# See /usr/share/doc/postfix/TLS_README.gz in the postfix-doc package for
# information on enabling SSL in the smtp client.
myhostname = hoge123.hoge123.dip.jp
alias_maps = hash:/etc/aliases
alias_database = hash:/etc/aliases
myorigin = /etc/mailname
mydestination = hoge123.dip.jp, hoge123.hoge123.dip.jp, localhost.hoge123.dip.jp, localhost
relayhost = [XXX.XXX.XXXX.XX.XX]
mynetworks = 127.0.0.0/8, 192.168.0.0/24
mailbox_size_limit = 0
recipient_delimiter = +
inet_interfaces = all
home_mailbox = Maildir/
smtpd_sasl_type = dovecot
smtpd_sasl_path = private/auth-client
smtpd_sasl_auth_enable = yes
smtpd_sasl_security_options = noanonymous
smtpd_sasl_local_domain = $myhostnameサブミッションポート587番でもPostfixがSMTPサーバとして待ち受けをするようにします。
root@hoge123:~# vi /etc/postfix/master.cf #submission inet n - n - - smtpd ↓ #を削除します。 submission inet n - n - - smtpd #smtps inet n - - - - smtpd ↓ #を削除します。 smtps inet n - - - - smtpd ↓ すぐ下にある以下の項目の、#を削除します # -o smtpd_tls_wrappermode=yes ↓ -o smtpd_tls_wrappermode=yes |
ユーザーアカウントの追加方法です。例としてdebian123を追加します。追加後は、debian123@hoge123.dip.jp と言うメールアカウントが使用できます。(debian123のパスワードはメール設定で使用しますので、忘れな いでください)
root@hoge123:~# useradd debian123← 任意のユーザ名を追加します。 root@hoge123:~# passwd debian123 Enter new UNIX password: ← 設定したいパスワードを入力します。 Retype new UNIX password: ← パスワード再入力 passwd: password updated successfully |
- Dovecotの設定 -
Dovecotのインストール、設定をします。
root@hoge123:~# aptitude -y install dovecot-common dovecot-pop3d dovecot-imapd
root@hoge123:~# vi /etc/dovecot/dovecot.conf

53行目付近、先頭の#を削除して、変更します。
disable_plaintext_auth = no

95行目付近、先頭の#を削除します。
ssl = yes

100行目付近、以下の2項目を変更します。
ssl_cert_file = /etc/ssl/server.crt
ssl_key_file = /etc/ssl/server.key

294行目付近、先頭の#を削除します。
mail_location = maildir:~/Maildir

893行目付近、先頭の#を削除して、追記します。
mechanisms = plain login

1120行目付近、以下のように変更します
socket listen { 先頭の#を削除します
#master {
# Master socket provides access to userdb information. It's typically
# used to give Dovecot's local delivery agent access to userdb so it
# can find mailbox locations.
#path = /var/run/dovecot/auth-master
#mode = 0600
# Default user/group is the one who started dovecot-auth (root)
#user =
#group =
#}
client { 先頭の#を削除します
# The client socket is generally safe to export to everyone. Typical use
# is to export it to your SMTP server so it can do SMTP AUTH lookups
# using it.
path = /var/spool/postfix/private/auth-client 先頭の#を削除し、変更します。
mode = 0660 先頭の#を削除します
user = postfix 追記します
group = postfix 追記します
  }先頭の#を削除します
 }先頭の#を削除します
}

root@hoge123:~# /etc/init.d/postfix restart
Stopping Postfix Mail Transport Agent: postfix.
Starting Postfix Mail Transport Agent: postfix.

root@hoge123:~# /etc/init.d/dovecot start
Starting Dovecot Imap:
|
- メール不正中継テスト -
smtpサーバを外部に公開するときは、第3者に自宅のsmtpサーバを勝手に利用されないようにしなければなりません。 不正中継されないか、Third Party Relay Chekck を実行します。
「ホスト名」にhoge123.dip.jpといれ「check」ボタンをクリックします。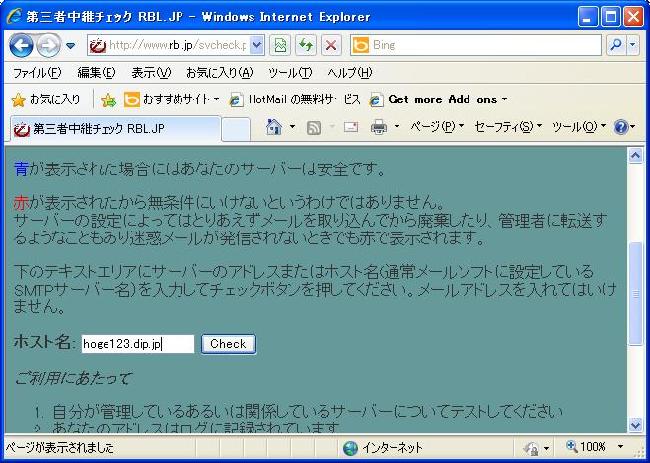
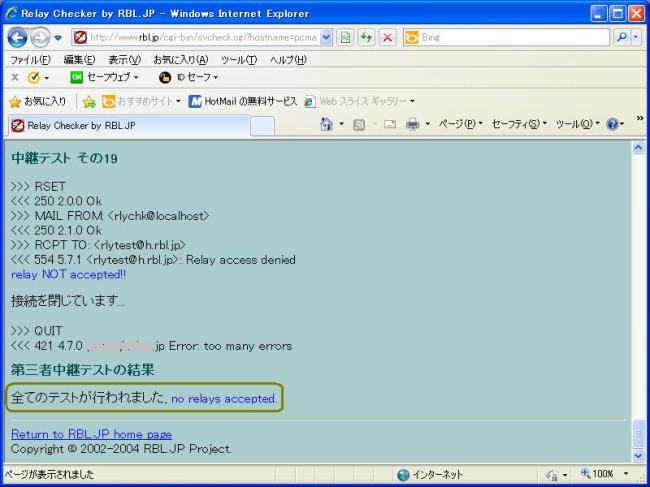
1分位待つと、結果が表示されます。最終行に「全てのテストが行われました。 no relays accepted」と表示されれば、不正中継テストはパスしています。
- メールクライアントの設定 -
OUTLOOK EXPRESS編
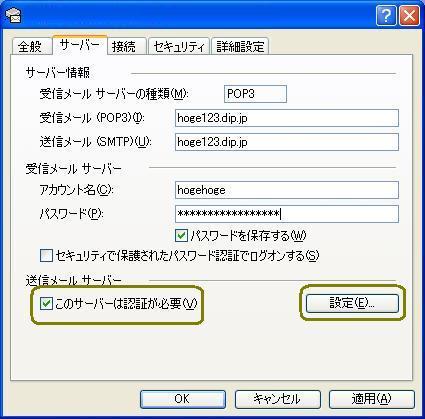
一旦、Smtp-Authが動作するか、メールソフトに設定します。下記設定をします。 「このサーバーは認証が必要」にチェックを入れ、「設定」ボタンをクリックします。
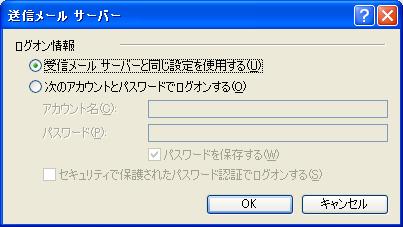
「受信メールサーバーと同じ設定を使用する」を選択して、「OK」ボタンを押します。
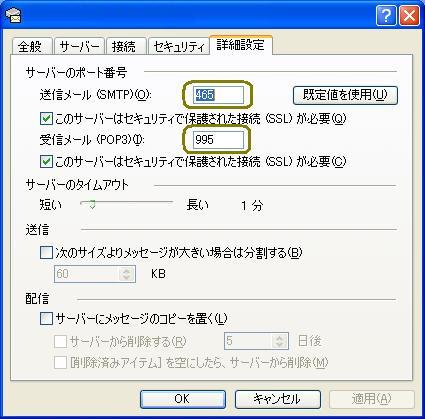
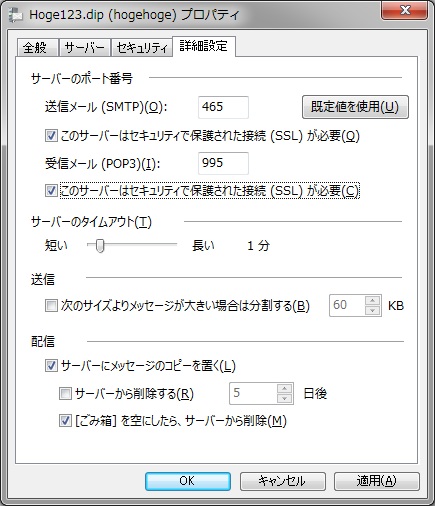
「詳細設定」では、「送信メール」は465、「受信メール」は995とします。両方とも「 このサーバーはセキュリティで保護された接続(SSL)が必要」にチェックを入れます。
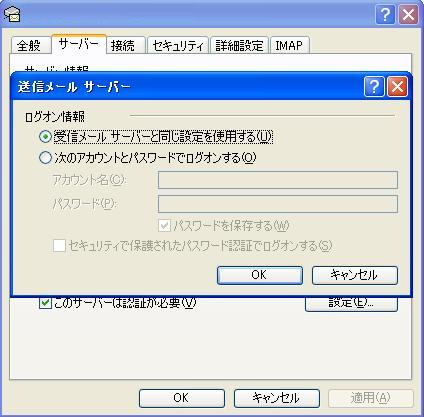
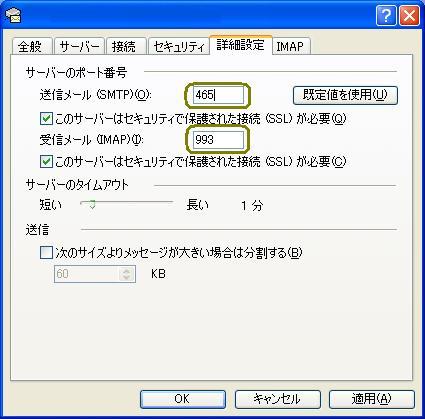
POPアカウントの他に、IMAPアカウントでも使用できます。その場合も、 「受信メールサーバーと同じ設定を使用する」を選択して、「OK」ボタンを押します。
「送信メール」は465、「受信メール」は993です。両方とも「 このサーバーはセキュリティで保護された接続(SSL)が必要」にチェックを入れます。
WINDOWS LIVE メール編
「送信メール」465、「受信メール」995(IMPAの場合993)に変更します。 両方とも「このサーバーはセキュリティで保護された接続(SSL)が必要」にチェックを 入れ、保存します。設定内容は、他のメールソフトでも同じです。
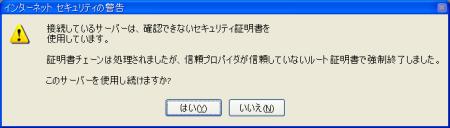
セキュリティ警告が表示されますが、「はい」を選択します。
送受信テストをします。これで暗号化された通信が可能になります。